As architects and designers increasingly incorporate open-plan spaces and dramatic lighting into their plans, it becomes more important than ever to consider how the wall finish will affect the desired result. A smooth finish is absolutely crucial wherever plans call for large uninterrupted surfaces or where the slightest imperfection will be emphasized by harsh light. However, drywall finish techniques and tools don’t typically occupy much mind share during the design and specification phase, but with a growing number of product solutions that can significantly streamline a project’s timeline while simultaneously leading to superior results it’s a good time to review the options.
Level 5 Finish: When Nothing But the Best Will Do
The amount of finesse required to achieve a perfectly smooth interior finish takes time, resources, and skill—which can be a major problem for an industry faced with a labor shortage. In fact, a recent survey from the Associated General Contractors of America revealed that 80 percent of construction companies can’t find the workers they need, forcing them to delay project timelines or even miss out on work entirely.
The skilled labor shortage is challenging no matter the job, but when the project requires a Level 5 finish, a dearth of skill and experience on the jobsite can be even more costly. A Level 5 finish is a premium result for a drywall installation specified in situations where the wall will take on a glossy paint finish, in areas where lighting may highlight imperfections in a wall texture, and in high-end spaces like formal dining rooms, hotel and casino lobbies, or corporate foyers where a perfectly smooth wall finish is desired.
Achieving a Level 5 finish is primarily dependent on the application of additional joint compound above and beyond what is required of a Level 4 finish—specifically applying a final skim coat and sanding over the entire wall or ceiling surface. Here is a quick breakdown of each of the finish levels:
- Level 0 – Drywall board is hung, but no finishing has been performed at all. Seams and screws are still visible, and any cracks or deformations are still present. This level of finish is usually specified in conditions where the final decoration aesthetic has not been chosen.
- Level 1 – Drywall tape has been applied over the seams with joint compound, but most of the mud that will eventually go on the wall is still not applied. Use Level 1 in areas where the drywall will be completely covered, such as in the areas above ceilings, attics, and other areas that will be generally concealed from view.
- Level 2 – A skim coat of mud is applied over the tape to blend the transition between the board and the tape and to cover any screw holes. Anything beyond a Level 2 finish is not required in applications where the drywall board will be used as a substrate, say in a kitchen or bathroom where a tile backsplash or large cabinets will be installed. In these examples, the tile or cabinets will cover any imperfections, so a Level 5 finish here would not add any benefit to the finished product.
- Level 3 – A heavier coat of joint compound is applied over the tape and screw holes to make things more even, but a perfectly flat finish is also not required here. Level 3 finish is typically applied where a medium-to-heavy texture (spray or hand-applied) will exist, such as popcorn ceilings. In these instances, there would be no added value to achieving a perfectly flat finish.
- Level 4 – This is the standard for most typical drywall projects. To get to Level 4, a second coat of compound is applied and sanded smooth. If non-glossy paint finishes or wallpaper will be used, this is more than adequate for the finish because it will be mostly flat, and any small imperfections will not detract from the function of the wall system. Level 4 finish is used where light texturing, flat paints, non-continuous texturing, and wallcovering is required, but perfect finished quality is not really a detriment to the presentation of the room.
- Level 5 –And that brings us to Level 5, where yet another layer of joint compound is applied to the wall and the entire surface is sanded again for a perfectly smooth finish.
If time and money were no object, all finishing contractors would strive to achieve Level 5 on every job. Even in typical projects like track homes, apartment buildings or small offices, certain areas may have surfaces that call for it. A flat ceiling with no popcorn texture, for example, receives a ton of sunlight throughout the day and is often one of the largest uninterrupted flat surfaces of drywall in the entire building. A Level 4 is mandatory here, but quite often a Level 5 finish is used to make sure everything looks perfect. It also cuts down on costly callbacks.
Innovative Materials Remove Much of the Guess Work
Clean transitions between dissimilar materials are crucial to maintaining the presentation of a Level 5 finish. To prevent time-consuming clean-up responsibilities, it is paramount that these transitions remain free of joint compound during the installation phase. Thankfully, there are a growing number of tools designed to take much of the artistry out of the equation.
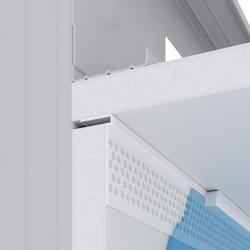
Products with removable masking legs are one useful tool that help to simplify the steps required for a Level 5 finish. These products, like ClarkDietrich’s Rip-Bead, are designed to cover the raw edges of drywall at ceilings, windows, and at the junction of other dissimilar materials. Rip-Bead profiles feature a 1/4" removable leg that acts as a guide for the taping knife and a protective mask during the application of joint compound. The removable masking leg allows for a less-refined approach when applying the mud; allowing crews to work more quickly and making it virtually impossible to be “sloppy” in their application.
The mask covers the finished edge of the installation until the final sanding stage, when it is removed to allow the entire wall to be sanded as a whole, thereby achieving a perfectly flat and smooth finish. Furthermore, Rip-Bead installs like any other trim material, so it doesn’t require any special training—even for contractors used to only using only metal or paper-faced trim products.
Working with trims without a masking leg requires more precision in joint compound application, which requires a greater level of skill and a higher time investment from skilled and unskilled installers alike. Using products like Rip-Bead which simplify the process allows finishing contractors to work with haste and still maintain the same quality expected from a slower, more methodical installation technique.
Michael Kirlin, a union drywall finisher with 20 years of experience and foreman for PDM Constructors, one of the largest drywall companies in Philadelphia, was recently introduced to a line of ClarkDietrich finishing products that helped his crew streamline work during a project at the University of Pennsylvania.
“In our business everything is about scheduling and quality of finish. These products are quicker, easy to install and probably most important to my company, are more cost efficient,” Kirlin said. “My company is always diving into innovative ways to produce an extraordinary product and these products will help us achieve our goals.”
Products like these are valuable in that they free up more experienced craftsmen to focus on the portions of an installation where their increased skillset is absolutely required. If architects and specifiers can help take some of the artistry out of Level 5 drywall finishing through innovative product solutions, it will not only lead to better results and happier building owners, but it will also make everyone more profitable.